Friday, September 9, 2016

EASY Creamy Crockpot Chicken and Mushrooms

When my husband and I were married 19 years ago, it was magical. I'll never forget the incredible friends and family who joined us for our special day. We had lots of wonderful gifts, including .... a crock pot. I remember thinking... really?! What am I... 70? Who uses a crock pot??!

Well, today I'm not ashamed to say... I use a crock pot! It's become one of my FAVORITE kitchen gadgets! And one of the few wedding gifts we received that day that we still use on a regular basis.

Let's face it... we're all busy and cooking dinner is something that can be a bit of a challenge when we're working and taking care of all life throws at us. SO... I want to share with you one of the many crock pot creations that makes life a little easier for us.

One of my favorites is creamy chicken and mushrooms. It's SO easy!!! It uses just three main ingredients:


Just chicken, mushrooms and your favorite soup. I like to use Campbell's Cream of Chicken, but you could use whatever you like (Cream of Mushroom, Cream of Celery, etc.).

This takes about six (6) hours to complete in the crock pot. However, I've left it for far MORE hours (10-12) and still had wonderful results. It's a great mixture to put in the crock pot before leaving for work and then when you get home, it's ready to go! YAY!

Here are the main ingredients:
  • 1 large can of Cream of Chicken Soup 
  • 16 oz of sliced Baby Bella Mushrooms (or your favorite type of mushrooms)
  • 1 1/2 pounds chicken breast or tenderloins
To start, spray your crock pot sides with cooking spray (such as Pam) OR line your crock pot with slow-cooker liners. Either will make clean up SO much easier.

Layer your chicken into the bottom of the crock pot pan. You can leave them in whole pieces as found at your store, or slice them up as I've done here:


I also take this opportunity to add some garlic salt and pepper at this point, if you are so inclined.

Afterwards, layer on your mushrooms on top of the chicken:


Then spread the soup over the top:


Next, pop it into your crock pot on low for 6 (or more) hours, then wait for deliciousness to arrive! Once completed, spoon the mixture over rice (my favorite!) or mashed potatoes. It is also good alone with your favorite sides. And if you have extra, it freezes VERY well!

There are LOTS of variations that can take place of this ... If you are vegetarian, try using thick, sliced Portabella mushrooms in place of the chicken with either Cream of Mushroom or Cream of Celery soup. Just be sure to  adjust your time.... it won't need to cook as long.

You can also cook this with less soup and mushrooms... if you prefer to have a less creamy mixture, use 8 oz of mushrooms and a SMALL can of your preferred soup. 

ENJOY!

Thursday, September 8, 2016

Deodorizing Stinky Shoes

Recently, by hubby and I had the chance to visit our nation's capital... Washington D.C. is an AMAZING city!  Full of wonderful monuments and museums, many of which are free to explore.Some of my favorites included the Spy Museum (free!), the National Portrait Gallery (free!) and Ford's Theatre (also free, with a free-will donation encouraged).We put MANY miles in each day we were there and had a fabulous time.


BUT...... Washington D.C. is incredibly HOT and HUMID in the summertime, particularly in August, when we visited. Haaving worked in D.C., I was prepared with several clothing options and many shoes, but my husband brought just ONE pair of walking shoes... his closed-toe sandals. I guess he was attempting to limit his baggage. Big mistake! 

We were there five days .... and on the last day, the skies opened up and doused us with an incredible amount of rain as we were walking back to our hotel. We were headed to the airport that night and looked like a couple of drowned rats. But that's okay... no one knows us here, right?! (ha!)

However... the hubby's shoes were so full of SWEAT and rainwater that they were just plain RANK. I mean nasty, nasty, nasty.... on the airplane, we had an empty seat between us and I could STILL smell those things from where I was sitting! UGH!

When we arrived home, he was ready to throw them out. But I begged him to give me a chance to save them. Surely I could find SOME way to get the nasty stank out!

The offensive shoes!
I decided to try a home remedy I had once heard of and hey... it couldn't hurt to try, right?  He was just going to throw them out if it didn't work.

Here's the recipe I used:

  • 1 1/2 cups of cornstarch 
  • 1 cup of baking soda 
  • Essential oils - I used Rosemary, Orange and Lemongrass (about 10-15 drops each)
I mixed them all in a bowl, then spooned them into two pair of his socks, tying off the ends tightly with rubber bands.


I flattened them out, then molded them into the shoes, leaving them (in the garage, because they WERE stinky) for about 24 hours, before checking the results.


Happily... we were THRILLED with the results!!!!! The shoes no longer smelled nasty and were once again wearable in public. And because of the scents I used, they weren't "girly" smelling, which my husband appreciated. And, as an added bonus, the garage smells GREAT!

He doesn't have to throw his favorite shoes out and he now thinks I'm brilliant, which is a plus (ha!).


Painting Tips!

Painting is always an adventure for me... and this project was no different!

My husband and I moved into our current home four years ago... and one project I've continued to put off is painting the family room on our main floor. The people who lived here before were both surgeons and had little time to paint anything (too busy saving lives, I guess - yeesh!), so it's been at least 10 years or more since it's been refreshed. One wall was a sickly, pale off-white and the others were stark white. You could even see on one wall, the outline of an oval picture that had once hung there many years ago. Lovely!  With our annual Halloween party fast approaching - and me still being off work -  there was no time like the present to tackle this project.

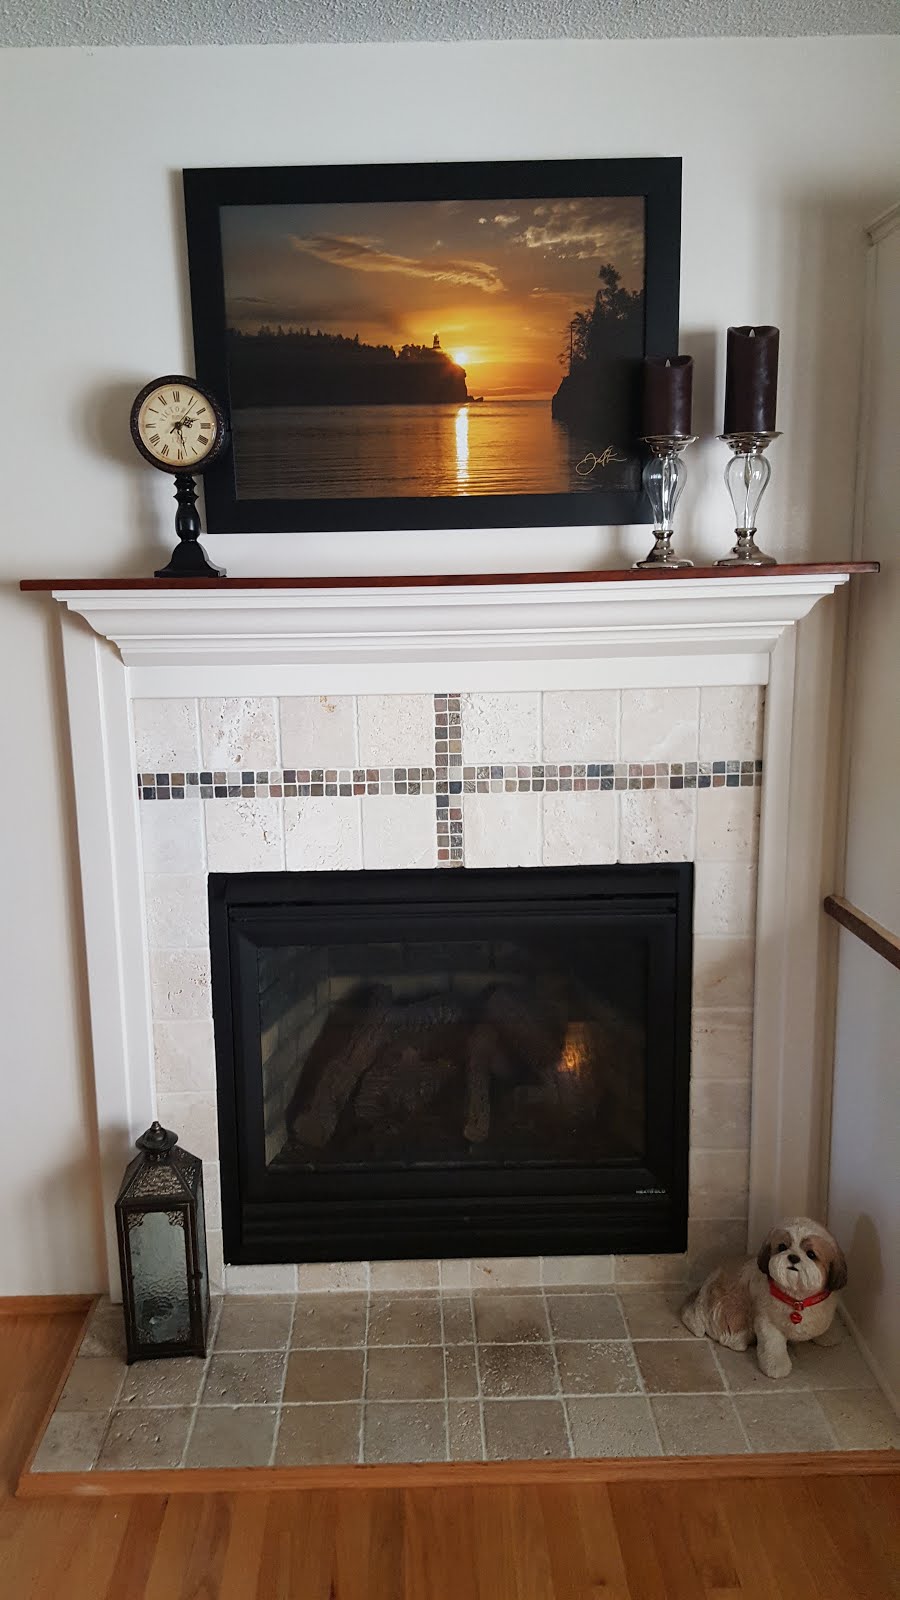
I couldn't get a shot of the entire room, but here's a picture of the fireplace before I started:


Pretty vanilla, huh?!  I learned a few important lessons during this project that I'd like to share with you.

Lesson #1: They sell those tiny paint samples in the stores for a reason.

Sadly, I learned this lesson a little too late.  I chose a Pittsburgh Paint color called "Hot Stone". (Don't you just love those paint names??! I want that job...)

According to the paint swatch, it was supposed to be a grey/beige (greige?) and I thought it would be perfect. Somewhat neutral, but still enough color to make the white on the fireplace pop, instead of fade into the wall like it was doing at the time.

When I opened the paint can, I was instantly worried. It looked to have a more greenish tint than grey: 

Green? Grey? Beige??!

 Uh oh... well, I know the color always looks different on the walls, so I took a leap of faith and started painting. Come to find out, on the wall, it has a significant blue tint.  See below: 


Oy.... well, the good news is, it actually looks good with the furniture in that room - and the hubster loves it - so I'm going to leave it. But one thing is for sure...I'll NEVER take on a painting project again without trying multiple samples on the walls first. I encourage you to learn from my pain!  

Lesson #2: Clean up

Image result for frog tape


I am  a messy painter... and a bit of a clumsy person. I'm not proud of it, but I know my limitations. So I always make sure to tape off the woodwork and put a drop-cloth on the floor. I've never had good luck with the "blue" painters tape, so I decided to try Frog Tape. I was delighted to find it worked SO much better!! 


When I pulled the tape off, it didn't pull the paint off the walls like the experience I had with the other brand. It cost a little bit more, but was well worth the few extra pennies.

However... I still managed to get a considerable amount of drips on the floor, despite my best efforts. How that happened, I'll never know. BUT... I have a new best friend when painting: 


Goo Gone Painter's Pal is AWESOME!!!!!!!  Honestly, where has this been all my life??!! I just sprayed a bit on the dried spots, waited a bit and they wiped right up, no problem. If there is stock to be purchase in this stuff, I will be snatching it up pretty darn quickly. It even helped with lesson #3...

Lesson #3: The Near Disaster on the Couch 

Remember, I said I'm a clumsy person. Seriously, it's sad. So after the walls were done and the tape was removed, there were lots of touch-ups to be done. I'm not the best at getting the tape on exactly straight, so the walls needed a bit of help. I put some of the paint in a plastic cup, took my tiny paint brush around and hit any spots that were missed. 

By the way... I couldn't find any tiny paint brushes in the home improvement stores, so you know where I picked mine up??  Walgreens! They were in the kids art section and worked beautifully! And for a fraction of the price of regular paint brushes.  They worked GREAT!

But then... disaster struck. As I walked around the back side of the couch (which had been carefully pulled into the center of the room to avoid any paint splatters), I bumped the cup holding the paint. And it went FLYING.... onto the fabric-covered couch and the walls I had just painted. 

I'm sure the neighbors in my happy little suburb wondered what the heck the screams and incredibly loud F-Bombs coming from our home were really all about. I'm not proud, but I'm pretty sure I could have made a sailor blush. 

I tried to wipe the paint off the cushions with paper towels. That was just smearing it around and making things worse. Thankfully, the majority of the paint landed on one cushion, so I grabbed it and made my way to the sink. Turning the water on HOT and using the spray nozzle, the paint began to rinse off the cushion. It took about 20 minutes and I also used a washcloth to work the paint out, but it's FINALLY back to normal. Whew!  

At that point, I turned my attention back to where the rest of the paint had landed - on the walls. It had been a good 20-30 minutes, so it was starting to dry. Yikes! 

This is where my BFF, Goo Gone Painter's Pal came into play. I sprayed it liberally on the the paint splatters and yep! They came right off with a quick swipe of a paper towel.

Ugh... what a day... it's time for a cocktail.